DIY Seamless Gutter Installation: Techniques, Tools, and Cost-Saving Strategies
Introduction: Why DIY Seamless Gutters?
Water damage stands as a homeowner’s most persistent adversary, capable of inflicting substantial financial and structural harm. The Environmental Protection Agency (EPA) emphasizes the critical importance of effective water management around residential properties, highlighting its direct impact on preventing costly structural failures and safeguarding against health hazards stemming from mold and mildew. Gutters serve as the primary defense in this water management strategy, efficiently channeling rainwater away from the foundation, thereby mitigating the risk of water infiltration and subsequent damage.
Investing in seamless gutters offers a superior solution compared to traditional sectional systems due to their inherent durability and reduced likelihood of leaks. Opting for DIY seamless gutter installation presents a compelling alternative to engaging professional services, offering substantial cost savings and the personal satisfaction of enhancing your home’s value and protection. The cost of gutters professionally installed can quickly escalate, encompassing material expenses, labor charges, and overhead. By undertaking the project yourself, you eliminate the labor costs, potentially saving hundreds or even thousands of dollars, depending on the size and complexity of your home.
Moreover, DIY gutter installation empowers you to customize the system to your precise needs, ensuring optimal performance and longevity. This guide will equip you with the essential knowledge and skills to navigate the intricacies of seamless gutter installation, providing a step-by-step approach to protect your home and your wallet. Beyond the immediate cost savings, DIY gutter maintenance contributes to long-term financial benefits. Regular inspections and minor repairs, easily managed by the homeowner, can prevent small issues from escalating into major problems requiring costly professional intervention. Understanding the nuances of seamless gutter systems, from proper installation techniques to effective cleaning methods, extends the lifespan of your gutters and minimizes the need for premature replacement. This proactive approach not only saves money but also provides peace of mind, knowing that your home is well-protected against the damaging effects of rainwater. Furthermore, mastering DIY gutter installation and maintenance enhances your overall home improvement skillset, opening doors to future projects and cost-saving opportunities.
Seamless vs. Traditional Gutters: A Clear Advantage
Seamless gutters offer several advantages over traditional sectional gutters. The primary benefit is the elimination of seams, which are common points of leakage. This reduces the risk of water damage to your fascia, soffit, and foundation. Seamless gutters are also more aesthetically pleasing, providing a cleaner, more modern look for your home. Traditional gutters, with their multiple connection points, are prone to clogs and require more frequent maintenance. Seamless gutters, fabricated from a single piece of metal (typically aluminum), minimize these issues.
Expert viewpoints often highlight the long-term cost savings associated with seamless gutters due to their reduced maintenance and longer lifespan. From a DIY perspective, while the initial cost of gutters and gutter installation equipment might seem higher for seamless options, the reduced need for frequent repairs and cleaning translates to significant savings over time. Consider that sectional gutters often require annual resealing at joints, a task that can be both time-consuming and costly if you hire a professional.
Seamless gutters, on the other hand, offer a more robust and reliable solution, demanding less frequent gutter maintenance. A study by the National Association of Home Builders found that homes with properly installed and maintained seamless gutters experienced a 60% reduction in water damage claims compared to those with traditional systems. This makes the investment in seamless gutters a smart choice for homeowners looking to protect their property and minimize long-term expenses. Moreover, the superior performance of seamless gutters directly impacts home value.
Potential homebuyers often view well-maintained homes as more desirable, and features like seamless gutters signal a commitment to quality and longevity. The streamlined appearance enhances curb appeal, while the reduced risk of water damage provides peace of mind. While the cost of gutters varies depending on material and size, investing in seamless options is generally viewed as a value-added improvement. DIY gutters installation of seamless systems, although more complex than sectional ones, is achievable with the right tools and preparation, further amplifying the cost savings.
By carefully measuring, selecting quality materials, and following best practices, homeowners can reap the benefits of seamless gutters without incurring exorbitant professional fees. Choosing seamless gutters is an investment in your home’s future. Their durability and reduced maintenance requirements offer long-term cost savings, while their sleek appearance enhances curb appeal. When evaluating the cost of gutters, consider the lifetime value and protection they provide. Seamless gutters stand out as a superior option for homeowners seeking to minimize water damage, reduce maintenance, and enhance the overall value of their property. The initial investment in seamless gutters pays dividends through reduced repair costs, increased home value, and the peace of mind that comes with knowing your home is well-protected from the elements.
Measurement and Material Calculation: Precision is Key
Accurate measurement is the bedrock of a successful seamless gutter installation. Before ordering any materials, meticulously measure the linear footage of your roofline where the seamless gutters will be affixed. This isn’t just about length; consider the complexity of your roof. Add extra length – a conservative estimate is 10-15% – to accommodate miters for corners (both inside and outside), potential errors, and to ensure adequate overlap at connection points. This upfront precision is a key element in minimizing waste and, ultimately, reducing the overall cost of gutters.
For DIY gutters, accurate measurements translate directly to cost savings by preventing unnecessary material purchases and return hassles. Next, determine your downspout requirements. Measure the vertical distance from each planned downspout outlet to the ground. Consider the roof’s pitch and drainage patterns to strategically position downspouts for optimal water removal. Insufficient downspouts can overwhelm the system, negating the benefits of seamless gutters. Don’t forget to calculate the number of hangers. Industry best practice dictates spacing hangers approximately every 24 inches for standard installations.
In regions with heavy snow or ice, consider closer spacing (18-20 inches) for added support. High-quality hangers are a critical component of gutter maintenance, preventing sagging and ensuring long-term performance. Material calculation extends beyond just linear footage. Itemize every component: end caps (left and right), downspout outlets, elbows (for directing downspouts), miters (for corners), hangers, fasteners (screws or rivets), and, crucially, a high-quality sealant specifically formulated for gutter systems. Many reputable gutter suppliers offer material calculation services based on your measurements. Leverage this expertise; they can often identify potential issues or suggest more efficient layouts. Remember, investing in premium materials, including a superior sealant, is a worthwhile investment that minimizes future gutter maintenance and extends the lifespan of your seamless gutters. The initial cost of gutters may be slightly higher, but the long-term savings from reduced repairs and water damage are significant.
Tools and Safety: Preparing for the Task
DIY gutter installation demands a carefully curated toolkit and unwavering commitment to safety protocols. Beyond the basics, consider these specialized implements: a measuring tape with laser precision for long spans, a digital level for exacting slope calibration, and a variable-speed drill equipped with self-feeding metal-drilling bits. A high-quality sealant gun, preferably one with a drip-reduction mechanism, ensures clean and efficient application of gutter sealant. For cutting seamless gutters, opt for powered metal shears over traditional tin snips to achieve cleaner, faster cuts, especially when working with thicker gauge aluminum.
A gutter crimper is essential for creating secure, watertight connections at downspout outlets and end caps. Finally, invest in a multi-position ladder capable of adapting to varying roof pitches, paired with a robust ladder stabilizer that spans the gutter itself, distributing weight evenly and preventing damage. These tools, while representing an initial investment, contribute significantly to the longevity and performance of your DIY gutters. Safety, however, remains the non-negotiable cornerstone of any gutter installation project.
According to the Occupational Safety and Health Administration (OSHA), falls are the leading cause of injury in construction, and working at heights necessitates rigorous adherence to safety guidelines. Always wear ANSI-approved safety glasses to shield your eyes from flying debris, and heavy-duty work gloves to protect your hands from sharp metal edges. A fall-arrest harness, properly anchored to a secure point on the roof, is strongly recommended, especially for single-story or higher homes. Never work alone; a ground assistant can provide support, monitor your progress, and summon help in case of an emergency.
Before commencing work, thoroughly inspect your ladder for any signs of damage or wear, and ensure it is placed on a firm, level surface. Be acutely aware of overhead power lines and maintain a safe distance of at least 10 feet. Ignoring these precautions not only jeopardizes your well-being but can also significantly increase the long-term cost of gutters by necessitating professional repairs due to improper installation or accidents. Furthermore, proactive planning significantly reduces risks and optimizes the cost of gutters and gutter maintenance.
Before ascending the ladder, meticulously plan each step of the installation process, pre-cutting gutter sections and organizing tools within easy reach. This minimizes the need to repeatedly climb up and down, reducing fatigue and the potential for accidents. Consider investing in gutter guards during the initial gutter installation to mitigate future maintenance requirements. Leaf filters, screens, or foam inserts prevent debris accumulation, reducing the frequency of gutter cleaning and prolonging the lifespan of your seamless gutters.
While the initial cost may be slightly higher, the long-term savings in time, effort, and potential water damage repair far outweigh the expense. Regularly inspect your DIY gutters for any signs of damage, such as leaks, sagging, or corrosion, and promptly address any issues to prevent them from escalating into more costly repairs. By prioritizing safety and implementing preventative maintenance measures, you can ensure the longevity and optimal performance of your gutter installation, maximizing your investment and safeguarding your home from water damage.
Installation Best Practices: Achieving a Professional Result
Successful seamless gutter installation hinges on best practices that ensure both functionality and longevity. Begin by meticulously attaching the gutter hangers to the fascia board. Maintaining even spacing, typically 24 inches apart, is crucial for distributing the weight of water and debris evenly across the gutter system. This prevents sagging and potential detachment, safeguarding your investment in DIY gutters. A slight slope is imperative for proper water flow; aim for a drop of approximately 1/4 inch per 10 feet of gutter.
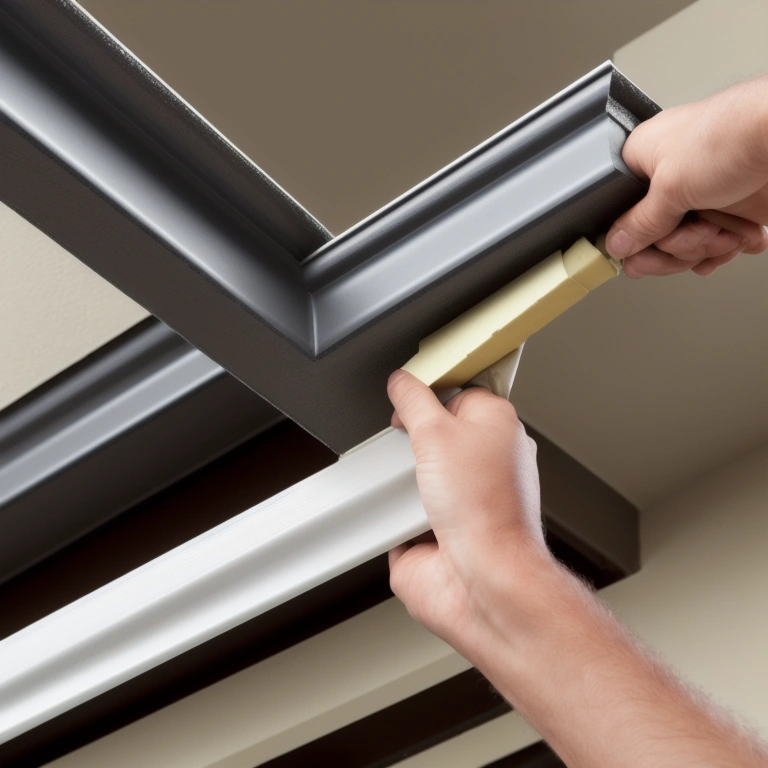
This seemingly small gradient harnesses gravity effectively, directing water towards the downspouts and away from your home’s foundation. Securing the seamless gutters to the hangers using screws or rivets provides a robust connection, with rivets often preferred for their durability and resistance to loosening over time. Proper sealant application is paramount in seamless gutter installation, especially when aiming to minimize the long-term cost of gutters. Apply sealant liberally at all joints, including end caps, outlets, and miters.
These are the most vulnerable points for leaks, and a generous bead of high-quality sealant creates a watertight barrier. Consider using a sealant specifically designed for gutter systems, as these are formulated to withstand temperature fluctuations and UV exposure. Ensure the downspouts are properly connected to the gutters and extend far enough away from the foundation to prevent water pooling. Government statements on building codes often specify minimum downspout extension requirements to protect foundations, but exceeding these minimums can provide extra insurance against water damage.
To further enhance the performance and reduce the need for frequent gutter maintenance, consider integrating gutter guards. These screens or mesh systems prevent leaves, twigs, and other debris from entering the gutters, minimizing clogs and the associated water damage risks. While gutter guards represent an upfront cost, they significantly reduce the labor and expense associated with regular cleaning, making them a worthwhile investment for many homeowners. Choosing the right type of gutter guard depends on the specific debris prevalent in your area, with micro-mesh systems being particularly effective at blocking even small particles. This pro-active approach to gutter maintenance can significantly extend the lifespan of your seamless gutters and protect your home from costly water damage, making DIY gutter installation a truly cost-effective home improvement project.
Troubleshooting, Cost Savings, and Maintenance
Even with meticulous planning, challenges can surface during DIY gutter installation. Common problems include leaks, incorrect slope, and sagging sections. Leaks often stem from insufficient sealant; rectify this by thoroughly cleaning the area with a wire brush and applying a fresh bead of high-quality, all-weather sealant. An improper slope, even a slight deviation, can cause water to pool, potentially leading to mosquito breeding and ice damage in colder climates. Correct this by carefully adjusting hanger placement, ensuring a consistent downward pitch of approximately 1/4 inch per 10 feet, using a level as a guide.
Sagging gutters usually indicate inadequate support; reinforce these areas by installing additional hangers, particularly at joints and corners, to maintain structural integrity. Before commencing any gutter installation, it is crucial to inspect the fascia board for rot or damage, as a compromised fascia can undermine the entire system. Repair or replace any deteriorated sections to provide a solid foundation for your seamless gutters. Addressing these issues promptly ensures the longevity and effectiveness of your gutter system.
Regular gutter maintenance is paramount for preserving the lifespan and functionality of your seamless gutters. Experts recommend cleaning your gutters at least twice a year, ideally in the spring and fall, to remove leaves, twigs, and other debris that can clog the system and impede water flow. Clogged gutters can lead to water overflowing and damaging your home’s foundation, siding, and landscaping. During cleaning, inspect the gutters for any signs of damage, such as cracks, rust, or loose hangers.
Address any minor repairs promptly to prevent them from escalating into more significant and costly problems. Consider installing gutter guards to minimize debris accumulation and reduce the frequency of cleaning. The cost savings associated with DIY gutter installation are substantial. The cost of gutters professionally installed typically ranges from $8 to $20 per linear foot, encompassing both materials and labor. Conversely, a DIY approach to seamless gutters installation typically reduces the cost of gutters to $4 to $10 per linear foot, primarily covering the cost of materials such as the seamless gutter sections, hangers, downspouts, and sealant.
However, it’s crucial to factor in the value of your time and the potential for errors. As Richard Trethewey, a plumbing and heating expert on ‘This Old House,’ notes, ‘DIY projects can save money, but only if done correctly. A poorly installed gutter system can lead to costly water damage that negates any initial savings.’ Therefore, meticulous planning, careful execution, and adherence to best practices are essential for a successful and cost-effective DIY gutter installation. By investing time in proper installation and consistent maintenance, homeowners can reap the rewards of effective water management while saving a significant amount of money.