Comprehensive Guide: Optimizing Home Energy Efficiency by Coordinating Insulated Window Installation with Roof Replacement
Introduction: The Power of Project Coordination
In an era defined by escalating energy costs and a growing awareness of environmental stewardship, homeowners are increasingly seeking innovative solutions to enhance energy efficiency. One often overlooked opportunity lies in strategically coordinating home improvement projects. Imagine a scenario where you’re already planning a roof replacement – a significant undertaking in itself. Now, consider integrating the installation of insulated windows into the same project. This synergy not only streamlines the process but also unlocks substantial cost savings and long-term energy benefits.
Coordinating these projects offers a holistic approach to improving a home’s thermal envelope, addressing major sources of energy loss simultaneously. According to the U.S. Department of Energy, heat gain and loss through windows account for 25%-30% of residential heating and cooling energy use. Combining insulated windows installation with roof replacement allows for optimized window flashing and sealing, crucial elements often compromised when projects are undertaken separately, leading to air leaks and moisture damage. The strategic alignment of roof replacement and window installation presents a unique opportunity to enhance a home’s overall energy performance.
Replacing an aging roof provides the ideal time to address potential structural issues around window openings and ensure proper integration with new insulated windows. Furthermore, many roofing contractors are also skilled in window installation or have established partnerships with window specialists, streamlining the project management process. This integrated approach minimizes disruptions, reduces the overall project timeline, and often results in a more cohesive and aesthetically pleasing outcome. Homeowners should view this coordination as a comprehensive energy efficiency upgrade, rather than two separate, independent tasks.
Looking towards the future, the convergence of home improvement projects like these will become increasingly critical for achieving ambitious energy reduction targets. As building codes evolve to demand higher levels of energy performance, homeowners proactively combining roof replacement with insulated window upgrades will be better positioned to meet these standards and maximize their long-term property value. Moreover, the increasing availability of smart home technologies that integrate with both roofing systems (e.g., solar shingles) and advanced window systems (e.g., automated shading) further underscores the benefits of a coordinated approach. By embracing this synergy, homeowners can create a more sustainable, comfortable, and energy-efficient living environment, contributing to a greener future while enjoying significant energy savings.
Benefits of Coordinating Window and Roof Projects
Coordinating window and roof projects unlocks a synergistic effect, yielding benefits far exceeding the sum of their individual parts. The most immediate advantage is cost optimization. Bundling insulated windows installation with a roof replacement empowers homeowners to leverage economies of scale. A single contractor managing both scopes often provides a more competitive bid, streamlining project management overhead and potentially unlocking bulk discounts on materials. For example, a homeowner might save 10-15% on the total project cost compared to hiring separate contractors, directly impacting their bottom line and accelerating the return on investment for these crucial home improvements.
Beyond direct cost savings, consider the long-term financial implications of enhanced energy efficiency. Coordinating these projects allows for a holistic approach to building envelope optimization. Properly installed insulated windows, coupled with a new roof featuring enhanced insulation, create a thermal barrier that significantly reduces energy consumption. This translates to lower monthly utility bills and a smaller carbon footprint. Moreover, government incentives and tax credits are often available for energy-efficient home upgrades, further sweetening the deal and reducing the overall financial burden.
The coordinated approach also minimizes disruption and maximizes the quality of the installation. A roof replacement naturally exposes the window frames, creating an ideal opportunity to ensure proper window flashing and sealing. This integrated approach prevents water damage and air leaks, which are critical for maintaining energy efficiency and preventing structural issues down the line. Coordinating the window installation with the roofing project ensures that the window flashing is properly integrated with the roofing system, creating a weathertight seal that protects the home from the elements for years to come.
This level of integration is difficult to achieve when the projects are completed separately. Finally, integrating energy-efficient upgrades such as insulated windows and a new roof substantially elevates a home’s market value. In an increasingly eco-conscious market, prospective buyers are willing to pay a premium for homes with demonstrable energy efficiency. Features like Energy Star-rated windows and a well-insulated roof are powerful selling points. Industry data consistently shows that homes with these upgrades command higher appraisal values and sell faster than comparable properties without them. This makes coordinating window and roof projects not just a smart move for current homeowners, but also a strategic investment for the future.
Evaluating Existing Window Efficiency
Before embarking on a window replacement project, especially when coordinating with a roof replacement, it’s crucial to conduct a thorough assessment of your existing windows’ energy efficiency. Look beyond obvious signs like drafts and condensation between panes. Utilize tools like an infrared thermometer to detect temperature variations across the window surface, indicating areas of heat loss. A significant temperature difference between the glass and the surrounding wall suggests poor insulation. Check the window’s U-factor and Solar Heat Gain Coefficient (SHGC) ratings, often found on a National Fenestration Rating Council (NFRC) sticker.
Lower U-factors indicate better insulation, while SHGC reflects how well the window blocks solar heat. Consider a professional energy audit for a comprehensive evaluation. This initial evaluation is the bedrock of informed decision-making, ensuring that your subsequent window installation and roof replacement efforts maximize energy savings and home improvement value. Neglecting this stage could lead to investing in solutions that don’t fully address the underlying issues. Beyond the obvious, delve into the subtle indicators of window inefficiency.
Examine the condition of the glazing and the seals around the glass. Fogging or discoloration between the panes of insulated windows signifies seal failure, rendering the insulation ineffective. Inspect the window frames themselves for signs of deterioration. Wooden frames may exhibit rot or warping, while vinyl frames can crack or become brittle over time. These structural issues compromise the window’s ability to maintain a tight seal, leading to air leakage and reduced energy efficiency. Furthermore, assess the functionality of the window hardware, such as locks and hinges.
Difficulty opening or closing windows not only poses a security risk but also indicates potential alignment problems that contribute to air infiltration. Addressing these subtle issues during a coordinated roof replacement and window installation project ensures a comprehensive upgrade. Finally, consider the impact of window flashing on overall energy efficiency and the crucial role it plays in preventing water damage, especially when coordinating with a roof replacement. Damaged or improperly installed window flashing can lead to water infiltration, which not only compromises insulation but also causes structural damage to the surrounding walls and roof sheathing.
Inspect the flashing for signs of corrosion, cracks, or gaps. Ensure that it is properly integrated with the roofing materials to create a watertight seal. Upgrading the window flashing as part of a larger home improvement project, such as insulated windows installation alongside roof replacement, is a proactive measure that protects your investment and maximizes long-term energy savings. Ignoring the flashing can negate the benefits of even the most energy-efficient windows, leading to costly repairs down the road.
Selecting Appropriate Insulated Windows
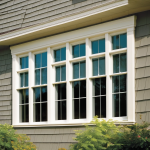
Selecting the right insulated windows is paramount for maximizing energy savings. Several factors come into play, including window type, energy ratings, and materials. Common window types include double-pane, triple-pane, and windows with gas fills (argon or krypton). Double-pane windows are a standard choice, offering improved insulation compared to single-pane windows. Triple-pane windows provide even greater insulation, reducing heat transfer and noise. Energy ratings, such as the U-factor (measures heat transfer) and Solar Heat Gain Coefficient (SHGC) (measures solar heat gain), are crucial indicators of energy performance.
Look for windows with low U-factors and SHGC values for optimal energy efficiency. Window materials also play a significant role. Vinyl windows are a popular choice due to their affordability, durability, and low maintenance. Wood windows offer excellent insulation and aesthetic appeal but require more maintenance. Aluminum windows are strong and durable but less energy-efficient than vinyl or wood. Composite windows combine the benefits of different materials, offering a balance of energy efficiency, durability, and aesthetics.
Top 10 most significant factors in selecting insulated windows: 1. U-Factor: Measures insulation, lower is better.
2. SHGC: Solar Heat Gain Coefficient, lower is better in hot climates.
3. Air Leakage: Lower leakage reduces drafts.
4. Visible Transmittance: Affects natural light.
5. Condensation Resistance: Prevents moisture buildup.
6. Frame Material: Affects insulation and maintenance.
7. Glazing Options: Double or triple pane.
8. Gas Fills: Argon or Krypton for better insulation.
9. Warranty: Protects against defects.
10.
Cost: Balancing performance with budget. Beyond these core considerations, understanding the interplay between window selection and roof replacement is critical for optimal home improvement and energy efficiency. For instance, the color of your roofing shingles can impact the SHGC of your windows; darker roofs absorb more heat, potentially increasing the load on your air conditioning system and negating some of the energy savings from your insulated windows. Therefore, consider a holistic approach, selecting roofing materials that complement your window choices.
Furthermore, proper window flashing, often addressed during roof replacement, is crucial for preventing water damage and air leaks, maximizing the lifespan and performance of your new windows. Discussing these interdependencies with your contractor ensures a coordinated strategy for long-term energy savings. When evaluating insulated windows, delve deeper into the specifics of energy ratings and certifications. Look for the ENERGY STAR label, which indicates that the window meets specific energy efficiency criteria set by the U.S.
Environmental Protection Agency. The National Fenestration Rating Council (NFRC) provides independent certification of window performance, allowing for objective comparisons between different products. Pay close attention to the air leakage rating, as even the most well-insulated window will underperform if it’s not properly sealed. This is especially pertinent when coordinating window installation with a roof replacement; ensure the window flashing is meticulously integrated with the roofing system to create an airtight and watertight barrier. Investing in high-quality, properly installed insulated windows contributes significantly to long-term energy savings and home comfort.
Finally, remember that the long-term energy savings of insulated windows are directly tied to proper installation and maintenance. Even the highest-rated windows will fail to perform optimally if not installed correctly, especially concerning window flashing and sealing. Ensure your window installation is performed by qualified professionals experienced in integrating window projects with roof replacement. Post-installation, regularly inspect the windows for any signs of damage or wear, such as cracks in the frame or seal failure. Address any issues promptly to prevent further degradation and maintain optimal energy efficiency. A proactive approach to maintenance will not only extend the lifespan of your windows but also safeguard your investment in energy-efficient home improvement.
Integrating Window Installation into the Roofing Project Timeline
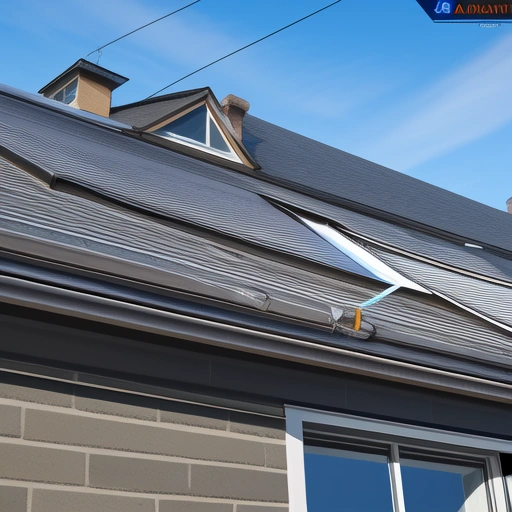
Integrating window installation into the roofing project timeline requires meticulous planning, transforming what could be a chaotic endeavor into a symphony of efficiency. The optimal sequence typically involves removing the old roof, installing the new insulated windows, and then completing the roofing installation. This order is not arbitrary; it’s strategically designed to facilitate proper window flashing and sealing, creating a robust, watertight barrier against the elements. Prioritizing window installation after roof removal allows for unobstructed access to the window openings, ensuring precise alignment and a flawless seal, critical for maximizing energy efficiency and preventing costly water damage down the line.
Clear communication with your contractor is paramount, establishing a detailed timeline that accounts for material procurement, potential weather delays, and inspection schedules. Beyond the basic timeline, consider the synergistic benefits of coordinating these projects. For instance, the scaffolding erected for a roof replacement provides convenient access for window installation, eliminating redundant setup costs. Furthermore, the removal of the old roof often exposes underlying structural issues around window frames that might otherwise go unnoticed, allowing for timely repairs and preventing future problems.
This integrated approach not only streamlines the process but also enhances the overall quality and longevity of both the roofing and window systems. Thoughtful coordination can significantly contribute to long-term energy savings and the overall value of your home improvement investment. One crucial aspect often overlooked is the selection of appropriate window flashing materials and techniques during this integrated process. Window flashing, typically made of metal or synthetic materials, acts as a protective barrier, directing water away from the window frame and into the drainage plane of the wall.
When coordinating window installation with roof replacement, ensure that the window flashing is seamlessly integrated with the roofing underlayment and flashing system. Improper flashing can lead to water infiltration, causing significant damage to the wall structure and compromising the energy efficiency of the insulated windows. Consulting with a qualified roofing and window installation professional is essential to ensure proper flashing design and execution, safeguarding your home against water damage and maximizing energy savings. Firms specializing in both roofing and window services, like Central Coast Roofing with their Colorbond roof replacement service, often possess the expertise to seamlessly integrate these critical building components.
Moreover, proactively addressing potential energy efficiency upgrades during this coordinated project can yield substantial long-term benefits. For example, consider upgrading to highly energy-efficient insulated windows with low-E coatings and argon gas fills. These windows significantly reduce heat transfer, keeping your home cooler in the summer and warmer in the winter, resulting in lower energy bills. Similarly, explore options for improving roof insulation during the roof replacement process. Adding a layer of insulation can further enhance energy efficiency and reduce your carbon footprint. By strategically integrating these energy-saving measures into the roofing and window installation project, homeowners can create a more comfortable, sustainable, and valuable living environment. Remember to factor in local building codes and energy efficiency standards to ensure compliance and maximize potential rebates or incentives for energy-efficient home improvements.
Step-by-Step Installation Process Overview
The window installation process, while seemingly straightforward, demands meticulous attention to detail, especially when integrated with a roof replacement project for optimal energy efficiency. First and foremost, safety is paramount. Before commencing any work, ensure adherence to OSHA guidelines, which often exceed basic homeowner precautions. Wear appropriate safety gear, including ANSI-approved gloves, eye protection (goggles or face shields), and a hard hat. Protect the work area both inside and outside the house with heavy-duty drop cloths or tarps to prevent damage to flooring, furniture, and landscaping.
A clean and organized workspace minimizes hazards and enhances efficiency. Removing the old window requires a delicate touch. Scoring the caulk lines with a utility knife before attempting removal minimizes damage to the surrounding wall, preventing costly repairs later. Inspect the rough opening for signs of rot or insect infestation; addressing these issues promptly is crucial before installing the new insulated windows. Proper preparation of the window opening involves not only cleaning and leveling the sill but also ensuring the structural integrity of the surrounding framing.
Shimming may be necessary to create a perfectly level and plumb surface for the new window, guaranteeing optimal performance and longevity. Flashing installation is a critical step often underestimated in its importance to long-term energy savings and structural integrity. Use high-quality, self-adhesive flashing membrane that extends beyond the window frame onto the sheathing, creating a robust barrier against water intrusion. Integrate the window flashing with the roofing underlayment for a seamless weatherproofing system, especially crucial when coordinating with a roof replacement.
When installing the new window, precise alignment is paramount. Use shims to achieve perfect level and plumb, ensuring the window operates smoothly and seals tightly against the elements. Secure the window to the frame using appropriate fasteners, following the manufacturer’s recommendations for spacing and depth. After securing the window, proper insulation is essential to maximizing energy efficiency. Filling the gaps around the window frame with expanding foam insulation not only prevents air leaks but also adds structural support.
Opt for a low-expansion foam specifically designed for window and door installations to avoid bowing or warping the frame. Sealing the window with high-quality, paintable caulk creates a watertight barrier, preventing moisture from penetrating the wall cavity. Choose a caulk that is specifically formulated for exterior use and is resistant to UV degradation. Finally, install trim and molding to conceal the gaps and enhance the aesthetic appeal of the window installation. A comprehensive cleanup, removing all debris and ensuring the safety of the work area, concludes the installation process. A final inspection, verifying proper installation and functionality, ensures long-term performance and energy savings. This integrated approach is vital for realizing the full benefits of coordinated home improvement projects.
Post-Installation Inspection and Maintenance
Post-installation, a meticulous inspection is paramount to guarantee the newly installed insulated windows are performing optimally and contributing to overall energy efficiency. Scrutinize each window for any signs of air infiltration, paying close attention to the perimeter where the window frame meets the wall. A simple test involves holding a lit candle or incense stick near the frame; if the flame flickers or the smoke wavers, it indicates a draft. Furthermore, carefully examine the window flashing, ensuring it is correctly installed and free from gaps or damage.
Proper flashing is critical for diverting water away from the window and preventing costly water damage, which can compromise the structural integrity of both the window and the adjacent wall. Finally, operate each window to confirm smooth opening and closing, verifying the locking mechanisms function correctly. Any resistance or sticking points should be addressed immediately to prevent premature wear and tear. Regular maintenance is crucial for preserving the long-term energy efficiency and lifespan of your insulated windows.
Cleaning the glass with a mild detergent and water will remove dirt and grime that can reduce light transmission and solar heat gain. Periodically inspect the caulk around the window frame for cracks or deterioration; re-caulk as needed to maintain a watertight seal and prevent air leaks. Lubricate window tracks and hardware to ensure smooth operation and prevent sticking. Addressing minor issues promptly, such as tightening loose screws or replacing worn weather stripping, can prevent them from escalating into more significant problems that require costly repairs or even window replacement.
Remember, proactive maintenance is a key component of maximizing your investment in energy-efficient home improvement. Calculating potential energy savings from coordinated window installation and roof replacement can provide valuable insight into the financial benefits of these home improvement projects. Utilize online energy calculators provided by organizations like the Department of Energy or consult with a professional energy auditor. These tools typically require information such as your home’s location, window specifications (U-factor, SHGC), existing insulation levels, and energy usage data.
By inputting this information, you can estimate the potential reduction in energy consumption and associated cost savings. Furthermore, consider the long-term benefits of increased home value and reduced maintenance costs. Coordinating these projects not only enhances energy efficiency but also contributes to a more comfortable and sustainable living environment. Many homeowners find that the combined savings and increased property value make these investments worthwhile. Several common pitfalls can undermine the effectiveness of window installation, leading to energy loss and potential structural damage.
Improper flashing is a frequent culprit, allowing water to penetrate the wall cavity and cause rot. Inadequate sealing around the window frame creates air leaks, diminishing energy efficiency and increasing heating and cooling costs. Selecting the incorrect window size can result in gaps and instability, compromising the window’s performance. Neglecting insulation around the window frame reduces energy efficiency and increases the risk of condensation. Ignoring local building codes can lead to fines and require costly rework.
Using low-quality materials shortens the window’s lifespan and reduces its energy efficiency. Skipping inspections allows potential problems to go unnoticed, leading to further damage. DIY installation without sufficient experience increases the risk of errors and compromises the window’s performance. Failing to obtain necessary permits can result in fines and delays. Overlooking routine maintenance reduces the window’s longevity and increases the likelihood of costly repairs. Always prioritize professional installation and adhere to best practices to ensure optimal performance and longevity of your insulated windows and roof replacement.